How to perform a GLUCUBE measurement
GLUCUBE measurement process
The device must be paired beforehand to perform a GLUCUBE measurement
When you turn on the device, GLUCUBE measurement will start in the APP.
The following screen will appear, reminding you of the instructions for performing an optimal measurement and you will have a few seconds to insert your finger (see section Handling the device and placing your finger) and start the measurement.

Once you start the measurement with GLUCUBE device, by inserting your finger into the device, the APP will indicate the measurement process. This consists of 3 steps.
STEP 1: CHECKING SIGNAL

In this step, the signal is checked to make sure it is correct for the measurement. To do this, the finger placement, ambient light and any interference that may affect the optimal functioning of the device will be analysed.
To do this, three indicators will appear on the screen that reflect the signal quality. If there is any problem with any of the checks, the indicator with the problem will appear next to the icon ![]() and a brief help message will appear.
and a brief help message will appear.
Every few seconds, the status of the indicators will change as these problems are resolved.
When the signal quality is optimal, the three indicators will appear with the icon ![]() and you will go directly to the next step.
and you will go directly to the next step.
Make sure that the device and your hand are supported in a stable manner and without too much incident light.
STEP 2: MEASURING...

In this step, glucose levels are being measured. You must keep your finger in a stable position and not move it for 20 seconds to ensure a correct measurement.
To ensure a correct measurement, we recommend:
- Keep your hand as stable as possible, avoiding movements
- Avoid forced positions that prevent the correct flow of blood in the hand
- Perform the measurement on a stable surface
- Breathe calmly, avoiding forced breathing
- Ensure that the finger correctly covers the window and is in a correct position following the instructions for use of the device
STEP 3: CALCULATING...

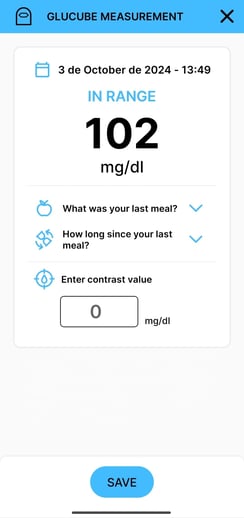
Finally, the measurement is processed to calculate the blood glucose level. You can now remove your finger from the device. The value will be displayed on the screen in a few seconds.
Save GLUCUBE measurement

- Select your last meal on the recording screen:
- Breakfast
- Mid-morning
- Lunch
- Snack
- Dinner
- Select how long ago your last meal was:
- Less than 1 hour
- Between 1 and 2 hours
- Between 2 and 3 hours
- Between 3 and 6 hours
- More than 6 hours
- Click Save to record the measurement.
On this screen you can enter the value of the capillary measurement. To do this, click on the "Contrast measurement" section at the bottom of the screen and enter the value.
If you only want to save a GLUCUBE measurement, it is not necessary to enter your last meal or how long ago your last meal was.